


How to make a friendship bracelet
Making friendship bracelets is a fun and creative way to share your love with someone close to you. You can express your friendship through fun colors and designs with a thoughtful gift that is also fun to make.
In a few easy steps, you can learn how to make a classic chevron friendship bracelet to give to a best friend forever (BFF), a relative, an acquaintance or even to keep for yourself.
What you need
Embroidery floss (or another type of thin string – I use DMC brand embroidery floss from Michael’s Craft Store)
Tape (or something to tie the bracelet around while you make it – I use a DMC brand metal craft ring from Michael’s Craft Store)
Scissors
Ruler
A friend (or someone to wear the bracelet when you are finished)
How to make it
Step 1: Choose your colors, or let your friend choose what colors they want. You can use three or more different colors; the more colors you use, the wider the bracelet will be. I recommend using four colors to begin.
Step 2: Measure about three to four feet of one color of the string, you will need to use more string for someone with larger wrists. Cut the string to the desired length and repeat this step for the rest of the colors.
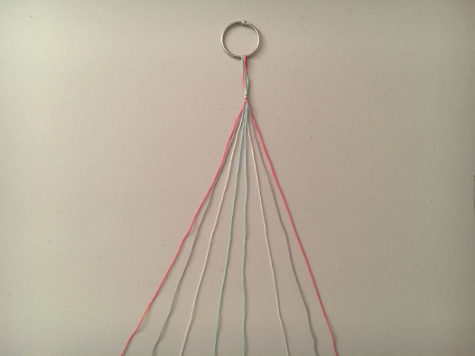
Step 3: Hold the strings together so the lengths are equal and fold them in half. Then, tie a knot on the folded end of the string. Now you should have two ends of each color and a loop at the top.
Step 4: Tape the loop side of the string to a flat service or hook the loop side of the string onto your craft ring.
Step 5: Separate the different colors in the order that you want. To line up the colors, you should have the two strings with the same color on the outside and match up the rest of the colors as the strings go in.
Step 6: Tie your first knot by taking the left outside string and putting it over the second string on the left to form a ‘4’ shape. Then tie a knot. Repeat this knot with the same two colors.
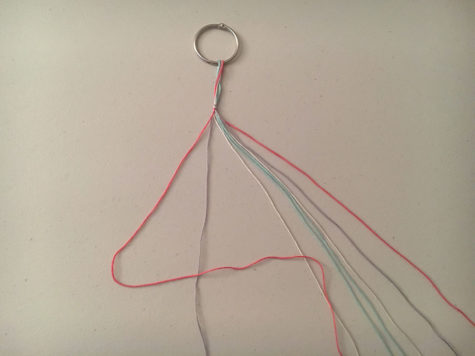
Step 7: Next, use the same color from step six and tie a knot with the next color to the inside. Continue with this color until you get to the middle where the colors reverse.
Step 8: Repeat steps six and seven starting with the right outside string.
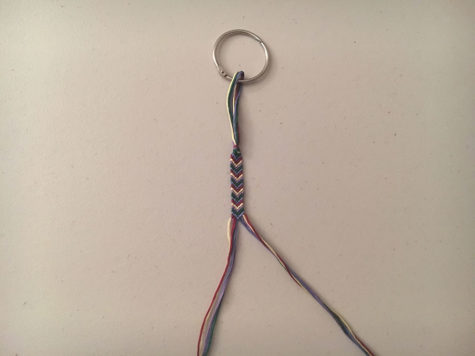
Step 9: With the two colors originally from the outside now in the middle, tie a knot to connect the two sides. You now have your first row.
Step 10: Repeat steps six through nine until the bracelet is long enough. Remember to leave enough string on the end to tie the bracelet.

Maggie Theel is 16 years old and she is a junior at Coppell High School. In addition to being a staff writer for The Sidekick, she is a diploma candidate...


Riley • May 12, 2016 at 1:23 pm
Wow, great story! After reading this “how to” I was able to create five friendship bracelets, thank you for opening up and sharing your wisdom. Truly an amazing piece.